The inability and not easy to configure ISA (Internet Security and Acceleration) Server and licenses on this product is a great burden when you are a System Administrator yet you are task to filter the websites being visited by your clients in a windows xp and 2003 environment.
Good thing that there's SQUID for windows nowadays. It helps those System Administrators implement web proxy cache,filtering, blocking of unwanted sites using SQUID.
This sites shows the step by step configuration and a bit scripting on SQUID.
1. Download SQUID here.
2. Extract the file and cut the folder named "squid" on drive C.
Preparing squid ::
Now we need to make squid's swap directories, which will contain all the cache data:
1. Open up Command Prompt (Start -> Run -> cmd.exe)
2. Navigate to c:\squid\sbin ( execute: cd /d c:\squid\sbin )
3. Run: squid -z
It should now create swap directories like so:

If it fails with "Abnormal Termination" or similar, then something went wrong. Don't proceed any further if this is so. Step through the tutorial again or grab my version of squid if you didn't.
:: Configuring browser ::
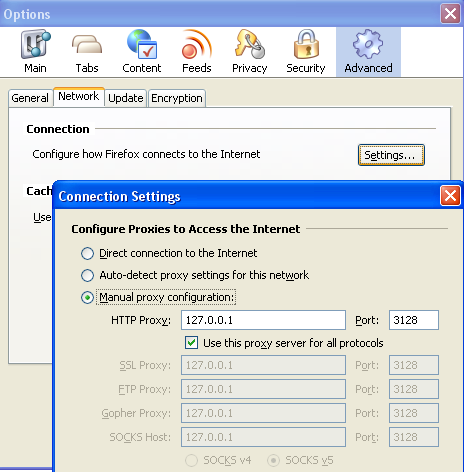
If you have Firefox, find your way to the Network Connection Settings menu and add IP 127.0.0.1 with port 3128 as a proxy like so:
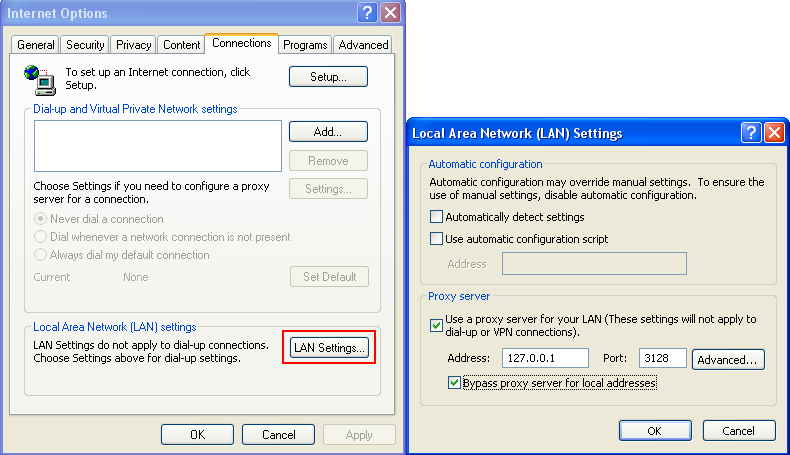
For Internet Explorer, you can do the same via the LAN Settings in Internet Options like so:
(You can undo these steps at any time if you get rid of squid in future or if it's causing problems)
Now try to view a website. It should fail.
That's good, it just means there's nothing already running on squid's port, which is what we want. We can now get the proxy up and running in the next section.
:: Testing squid ::
With the prompt still open, run: squid -X
The -X switch just tells squid to stay attached to the prompt and show heaps of output. You should see a whole heap of text, and then squid will look like it's paused like this:

With the prompt still open with squid running, try to browse in Firefox or Internet Explorer. It should work this time round. Great!
Now hold CTRL and then C to terminate the squid session.
:: Finalising squid ::
Now we wrap it up so that squid is launched automatically when Windows starts.
Again with the prompt still open, run: squid -i -n squid -O "-D"
It should now output success:

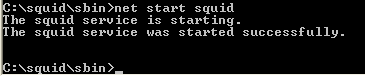
You can now reboot to get squid to run in the background, or alternatively launch the service manually just this once: net start squid
The tutorial is now complete. You can now enjoy the benefits of a local web proxy cache and snappy browsing!
:: Serving a LAN ::
The tutorial was written to show how one would run and use squid locally. This is because the typical desktop machine isn't necessarily on 24/7 to allow other machines to have proxy access. If your situation differs and you wish to allow other machines to connect, it's fairly simple to achieve.
1. Open up c:\squid\etc\squid.conf in a text-editor.
2. Search for: 10.0.0.0/8
You'll see several 'allow' rules for different networks/subnets:

If one of these IP ranges corresponds to your LAN then you don't need to alter the configuration file. Otherwise, simply add a new rule for your network (or modify the existing ones). The "192.168.0.0/16" template would be the best to build from for most purposes. Once you've made the configuration change, restart the squid server (either reboot or perform: net stop squid followed by net start squid).
Now just restep through the "Configuring Browser" step earlier in the tutorial for the other machines, but put the LAN IP of the squid server in.
Now we need to make squid's swap directories, which will contain all the cache data:
1. Open up Command Prompt (Start -> Run -> cmd.exe)
2. Navigate to c:\squid\sbin ( execute: cd /d c:\squid\sbin )
3. Run: squid -z
It should now create swap directories like so:
If it fails with "Abnormal Termination" or similar, then something went wrong. Don't proceed any further if this is so. Step through the tutorial again or grab my version of squid if you didn't.
:: Configuring browser ::
If you have Firefox, find your way to the Network Connection Settings menu and add IP 127.0.0.1 with port 3128 as a proxy like so:
For Internet Explorer, you can do the same via the LAN Settings in Internet Options like so:
(You can undo these steps at any time if you get rid of squid in future or if it's causing problems)
Now try to view a website. It should fail.
That's good, it just means there's nothing already running on squid's port, which is what we want. We can now get the proxy up and running in the next section.
:: Testing squid ::
With the prompt still open, run: squid -X
The -X switch just tells squid to stay attached to the prompt and show heaps of output. You should see a whole heap of text, and then squid will look like it's paused like this:
With the prompt still open with squid running, try to browse in Firefox or Internet Explorer. It should work this time round. Great!
Now hold CTRL and then C to terminate the squid session.
:: Finalising squid ::
Now we wrap it up so that squid is launched automatically when Windows starts.
Again with the prompt still open, run: squid -i -n squid -O "-D"
It should now output success:
You can now reboot to get squid to run in the background, or alternatively launch the service manually just this once: net start squid
The tutorial is now complete. You can now enjoy the benefits of a local web proxy cache and snappy browsing!
:: Serving a LAN ::
The tutorial was written to show how one would run and use squid locally. This is because the typical desktop machine isn't necessarily on 24/7 to allow other machines to have proxy access. If your situation differs and you wish to allow other machines to connect, it's fairly simple to achieve.
1. Open up c:\squid\etc\squid.conf in a text-editor.
2. Search for: 10.0.0.0/8
You'll see several 'allow' rules for different networks/subnets:
If one of these IP ranges corresponds to your LAN then you don't need to alter the configuration file. Otherwise, simply add a new rule for your network (or modify the existing ones). The "192.168.0.0/16" template would be the best to build from for most purposes. Once you've made the configuration change, restart the squid server (either reboot or perform: net stop squid followed by net start squid).
Now just restep through the "Configuring Browser" step earlier in the tutorial for the other machines, but put the LAN IP of the squid server in.
Configure squid.conf to filter some websites
To filter streaming sites like youtube or metacafe edit the file "squid.conf" using notepad C:\squid\etc\squid.conf file and do this script
acl nameofscript dstdomain sites sites sites
http_access deny nameofscript
see example.

To filter streaming sites like youtube or metacafe edit the file "squid.conf" using notepad C:\squid\etc\squid.conf file and do this script
acl nameofscript dstdomain sites sites sites
http_access deny nameofscript
see example.
